Showing posts with label k-way. Show all posts

Sunday, 1 November 2015

How do I prepare?

Mount Kilimanjaro is definitely one of the most climbable mountains because of its low technicality.  In other words, you need legs and feet instead of ropes and ladders.  And there have been climbers in wheelchairs so legs and feet are also not 100% necessary.


But how does one prepare for this 70km walk?  Where does one start? How long before the time should one start?  These are all questions our team asked and not all followed the same advice.  It is important to note that each person has a different fitness level and you should base your preparation on your current fitness level  If you are a relatively active person who visits the gym al least once a week you will need to start training about 3 months before the climb.  If you are a couch potato who has never been to the gym and who is only doing this to prove something, you might have to abandon the idea and go with something else.  However, if you walk often and climb stairs instead of the lift you can start about 6 months before the climb.

Our group was a bit nervous so we started about a year before the time.  Our very first fitness test was a 10km hike in tennis shoes, carrying small water bottles and no snacks.  I couldn't talk much because I was so out of breath!  And I am an active person, seeing the inside of the gym at least once a week.

It is definitely a good idea to start with something like a long hike.  10 to 15 km on the very first try.  This will give you a mental gage.  Try to do a long hike at least once a month if you plan to start a year in advance.  If you are comfortable to start 3 months before, take a hike each weekend.  Try to pack your daypack with all the goodies you would take onto the mountain.  Always fill up your hydration pack even if you won't use it all.  Always have breakfast - I like a boiled egg or two.


Preparation
Day 1
1-hour aerobics in the gym or similar - gardening won't cut it, it needs to be more intense than that.
Day 2
Suburban hike - find a route, preferably with a steep hill, in your neighbourhood.  Try to walk for at least 3 hours.  You have to walk briskly as if you are going to miss the bus.  Otherwise, there is no point...
Day 3
Endurance - my suggestion would be to choose a hill and walk up and down as many times as possible in a set time - at least 2 hours.  You have to be out of breath. It prepares you for those out of breath moments on top of the mountain.  If you live in a ver flat area, join the gym and set the treadmill to very steep.  It is not really the same but try and make the best out of it.  The hill prepares you for the uphill you will face daily.
Day 4
Rest - although it is better to do something each day but be careful not to over train.  You won't overtrain your body but your mind will probably get tired of doing the same thing each week.
Day 5
Resistance - do an hour of resistance training at the gym.  Focus on legs as they will have to be strong on the downhill.
Day 6
10 to 15 km hike in a bushy, rocky area.  Groenkloof Nature Reserve works very well as well as Fearie Glen Nature Reserve.  I am sure there are lots of rocky trails in Johannesburg and Krugersdorp.  Cape Town has the best options of course.  I am almost sure KwaZulu Natal even better.
Day 7
I would rest again but you could do an hour long suburban walk... Depending on your fitness level.

You could mix it up a bit and add some swimming or running.  You should do what you like.

1.  Train you legs and feet to get used to up and downhills
2.  Train your lungs for the out of breath feeling
3.  Train your mind for the long hikes that feel like they will never end
4.  Get used to your climbing party
5.  Get used to your gear

Be careful of sprains and strains - you don't want to end the trip before it starts.  Also ALWAYS wear two pairs of socks.  even if it is very warm - it will prevent blisters.

www.africanreignsafaris.com


Monday, 5 January 2015

Are Hiking Poles Really Necessary?

I didn't read too much about hiking poles before we left other than looking at prices online.  The marketers that sell tours and get kick backs from certain famous shops like to try and punt all the unnecessary gear... And I thought poles were a bit overkill.

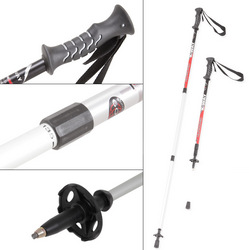
I saw pics of people hiking with just one pole which had a handle much the same as a normal walking stick or cane.  I had a look at the different ones available in stores and they all seemed the same.  Retractable shaft and wrist straps were standard.  All had protective rubbers on their ends and most had a little round "thingy" that I didn't know much about.  OK, I didn't know anything about it.

Turns out I left my job for a new one and the farewell gift were 2 K-Way Kilimanjaro Hiking poles from Cape Union Mart.  Yeah! Something I thought I didn't really need which I got as a gift.

K-Way, Hiking Poles, Kilimanjaro

My hiking buddies said: "you need to practice with those". So, off I went, hiking poles ready.  Man what an effort.  They are either in the way or too long or the terrain is too rocky... so I decided to take them to Tanzania with me and NOT to practice with them.

Unknown to most the rubber is not meant for rocky terrain but to protect the inside of your bags during the flight.  They fit into the duffel bag easily and I held thumbs that the airline staff would not force my bag into a funny position for them to be destroyed!  On arrival, they were fine and so was my bag...

On day one I had them ready.  I even fixed a GoPro to the handle in case I only wanted to use it as a monopod or extension pole.  I found out that even a GoPro is heavy and I had to swap sides every day.

hiking poles, Kilimanjaro

On day one the climb was already a challenge.  Thank goodness for these poles!  When walking they take off around 7 kg off your feet.  You get to lean forward when it really gets tough and they help you up the uphill parts when your legs can't do the work anymore.

I have to say the hiking poles are a must!  And even if you decide not to walk with them from day one, you will definitely need them on summit night.  That's when I leaned on them the most!

A tip is to adjust them once to the desired length and keep them that way.  They may freeze if you retract them before summit... Mine were quite long as I am tall so that I could pull my feet off the ground.

Even on the downhill, they helped a lot.  The ground is slippery at times and a hiking pole can assist when there are no branches or trees to grab onto.

Yes they make you walk slower and yes at times they are in the way but you walk slowly on Kili anyway...

If you plan to climb just one mountain, get the cheaper hiking poles.  Be aware though, they may not last the trip...

Tuesday, 9 September 2014

Why so much water?


The so called experts advise drinking a lot of water during your climb. But I really couldn't understand how that would help me. I mean I don't drink a lot of water during the day and only have a sip now and then during a training hike.

And who wants to stop for n pee break every hour. Because I have noticed that if I don't sweat, I pee a lot ;) 

Taking a whole hydration system to climb Kilimanjaro felt a bit extreme but I suppose there is a good reason for it...  I only realised this on the way down!

Drinking water helps to hydrate the lungs and brain. Your body is an engine and mostly comprises of water. The air is so dry that snow evaporates rather than melts. Drink water to keep your engine running!

I love this pack from K-Way. It takes a 2l hydration bladder and has some space for n rain jacket. Although a day pack is advised for climbing Kili, next time I will summit with only water and pay a porter extra to walk with my and carry clothes that I may want to take off. 


This pack is available at Cape Union Mart for R499. It does not include the bladder. I also needed to snip off a section of the pipe - it was a bit long. Luckily the nozzle squeezes back easily.

#k-way #capeunionmart #geartesting