Showing posts with label Day 4 Machame. Show all posts

Tuesday, 6 January 2015

These boots are made for walking

Hiking boots are probably the most important thing during your climb up Mount Kilimanjaro.  In South Africa, we don't really get a wide range of snow boots.  Our weather is pretty mild in comparison with the Northern Hemisphere.

When I started preparation for this adventure, I tried on ONLY 2 pairs of boots.  I don't know why... I mean there are so many boots on sale and I just looked at 2 different ones.

Firstly I believe that the boot needs to be high.  It protects your ankles (the last thing you need is a sprain or strain on the highest free-standing mountain in the world) and it keeps you warm.  Secondly, the shoe needs to be waterproof.  Not water resistant, WATERPROOF.  The other thing you don't want is a boot soaked in water.  They don't dry out - even in normal weather let alone freezing temperatures. Thirdly they should have soles that are tough and can grip successfully.  You will spend 6 to 8 days on your feet so the soles need to be strong enough for you not to feel each and every small rock after 2 hours.  Gripping is important especially on the way down. Finally, I believe that boots need to be light weight.  Each kilogramme you have to lift feels like ten at low altitude.

Cape Union Mart had a few options to choose from however at the moment (Dec 2014/Jan 2015) they only have 1 men's boot that may be able to do the job.  And not even the staff is convinced.  Let's hold thumbs that their new stock will arrive soon!

I went for this one.  The Salomon COSMIC 4D 2 GTX®

This is the men's version and I took a size larger than I usually wear.  You don't need to wear these in like in the old days.  If you buy them the day before you start your climb you will be able to climb without issues.  This make of shoe is small.  So if you have a wide foot or high bridge it is not for you.  That's why you need to try on a few.

They did a really good job.  This is them after the climb. I replaced the laces with elastic laces.  Too many people spoke of fingers not being able to lace boots because of cold so I went for an elastic. My feet were so ice cold during the summit.  So I don't think this boot will do in colder temperatures.

I think if it rained then I would have had wet shoes.  They say that they are waterproof but I am not convinced.  I didn't test water on them though...  I did not have any blisters and only my toes were a bit sore on the last day.  My socks were too tight.

In future, I may think about Keen boots.  They are wider and warmer.

I am sure there are many boot options to go for. Just try them all on and think about them being warm and waterproof.  It is a pity you can't take them back if you test them in water :)

www.africanreignsafaris.com


Monday, 5 January 2015

Are Hiking Poles Really Necessary?

I didn't read too much about hiking poles before we left other than looking at prices online.  The marketers that sell tours and get kick backs from certain famous shops like to try and punt all the unnecessary gear... And I thought poles were a bit overkill.

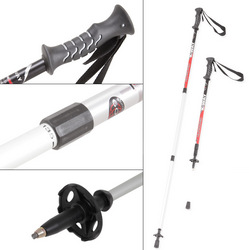
I saw pics of people hiking with just one pole which had a handle much the same as a normal walking stick or cane.  I had a look at the different ones available in stores and they all seemed the same.  Retractable shaft and wrist straps were standard.  All had protective rubbers on their ends and most had a little round "thingy" that I didn't know much about.  OK, I didn't know anything about it.

Turns out I left my job for a new one and the farewell gift were 2 K-Way Kilimanjaro Hiking poles from Cape Union Mart.  Yeah! Something I thought I didn't really need which I got as a gift.

K-Way, Hiking Poles, Kilimanjaro

My hiking buddies said: "you need to practice with those". So, off I went, hiking poles ready.  Man what an effort.  They are either in the way or too long or the terrain is too rocky... so I decided to take them to Tanzania with me and NOT to practice with them.

Unknown to most the rubber is not meant for rocky terrain but to protect the inside of your bags during the flight.  They fit into the duffel bag easily and I held thumbs that the airline staff would not force my bag into a funny position for them to be destroyed!  On arrival, they were fine and so was my bag...

On day one I had them ready.  I even fixed a GoPro to the handle in case I only wanted to use it as a monopod or extension pole.  I found out that even a GoPro is heavy and I had to swap sides every day.

hiking poles, Kilimanjaro

On day one the climb was already a challenge.  Thank goodness for these poles!  When walking they take off around 7 kg off your feet.  You get to lean forward when it really gets tough and they help you up the uphill parts when your legs can't do the work anymore.

I have to say the hiking poles are a must!  And even if you decide not to walk with them from day one, you will definitely need them on summit night.  That's when I leaned on them the most!

A tip is to adjust them once to the desired length and keep them that way.  They may freeze if you retract them before summit... Mine were quite long as I am tall so that I could pull my feet off the ground.

Even on the downhill, they helped a lot.  The ground is slippery at times and a hiking pole can assist when there are no branches or trees to grab onto.

Yes they make you walk slower and yes at times they are in the way but you walk slowly on Kili anyway...

If you plan to climb just one mountain, get the cheaper hiking poles.  Be aware though, they may not last the trip...

Friday, 18 July 2014

Day 4 - Machame - 2 July 2014

Our group was like a well-oiled machine by day 4.  Packed, breakfast served and ready to climb by 07:00.  We started off with gloves and hiking poles and only after a short walk the guides told us that poles would not be needed.... what was waiting for us????

I didn't do too much reading before we arrived so I had no idea what was up ahead.  I just followed the guide. We started climbing over boulders and ledges.  It was so much fun!  We slid past large rocks on ledges - the ledges were moderate - not too high and not really narrow. It was like playing around on a big playset.  I think everybody enjoyed it. A degree of fitness is definitely needed to enjoy this part of the journey - but if you are not too fit, you will still make it.

After the climb, we reached a plateau with great views and had a snack and water.  Onward!! from this point on it was down down down.  A difficult down I must say. The ground was like powder and you don't really have spots to grip... hiking poles help a lot! But stepping carefully is essential.


After reaching the valley, we had to go up again.  Wow, and what a steep up!! Once you stop you can't get yourself to start again - so don't stop! Up up up, porters passing you up up up some more!  When we reached the top we found our lunch tent waiting! (Karanga 3930m) After a short wait, we had to head on.  Here was more dust and more rocks.  We were now on our way to base camp.  Barafu camp (4681 m).


But before we reached the camp there were more uphills.  It felt like walking on broken slate tiles.  Everywhere you look there were rock towers that people built.  There's not much cover so every large boulder would be a bush toilet - but at least we beat the traffic so that was ok :)


Our sunbeam during the whole trip welcomed us on arrival - only to see that it was not the camp :( Another up up up!!

We pressed on and finally arrived at Basecamp - Barafu Camp.  You could see the summit!  And now we had to calm down and go to sleep!  How was this possible :)

The group had a quick dinner of soup, pasta and vegetables.  We tried to sort out our things for the summit.  It was difficult - racing breath and adrenaline rushing.  We put our heads down and slept for 4 hours....

Read more about the summit

Route Overview:
Distance:  4 km
Duration:  4-5 hours
Gain:  678 m


Summit
Distance:  5 km
Duration:  7-8 hours
Gain:  1222 m

www.africanreignsafaris.com